Showing posts with label Tutorials. Show all posts

Thursday, November 4, 2010

Tutorial: Magnetizing the Screaming Bell/Plague Furnace

Being a man of poor means, I have to stretch every gaming dollar I possibly can.  Furthermore, when new editions change some units drastically change in power level.  Just ask anyone who played Tyranids from 4th to 5th.  Ask them where their Carnifex arms are.  Mine are magnetic so I survived just fine.

When I got the Screaming Bell I was determined to magnetize it, no matter how hard it seemed.  It's an expensive kit and both options seem attractive.  I'm not experienced enough in 8th yet to know which is better and there is rarely a better teacher than experience, so I'm going to have to run both to find out.  I tried finding a tutorial online for magnetizing this beast but there were very few, and I knew I could figure out a better way to do it than the ones I found.

This may seem like a lengthy preface for a tutorial, but this is a seriously difficult project.  This is the hardest thing I've ever magnetized, even harder than the Trygon I did earlier.  First off, the kit is among the most complex I've ever put together.  The Doomwheel is difficult as well, but this one takes the cake.  It has supurb detail but also a ridiculous amount of surfaces and delicate parts.  I almost snapped several of the flame/vapor tendrils on the model while cutting them off.  This is not a kit for beginners (and there's a lot of beginners getting into Skaven because of the IoB, but that's a topic for another day).

What makes this kit so difficult is that the kit shares several pieces in either the Bell or Furnace assembly.  Compounding this is that most of these are key weight-bearing joins.  The yoke and arches are the prime examples.  The back platform being reverseable depending on what you're running is a simple fix but the arches and yoke will be the hardest part.  Steel yourself, double check your polarizations and let's dive in.

Above you can see all the different components of this magnetization.


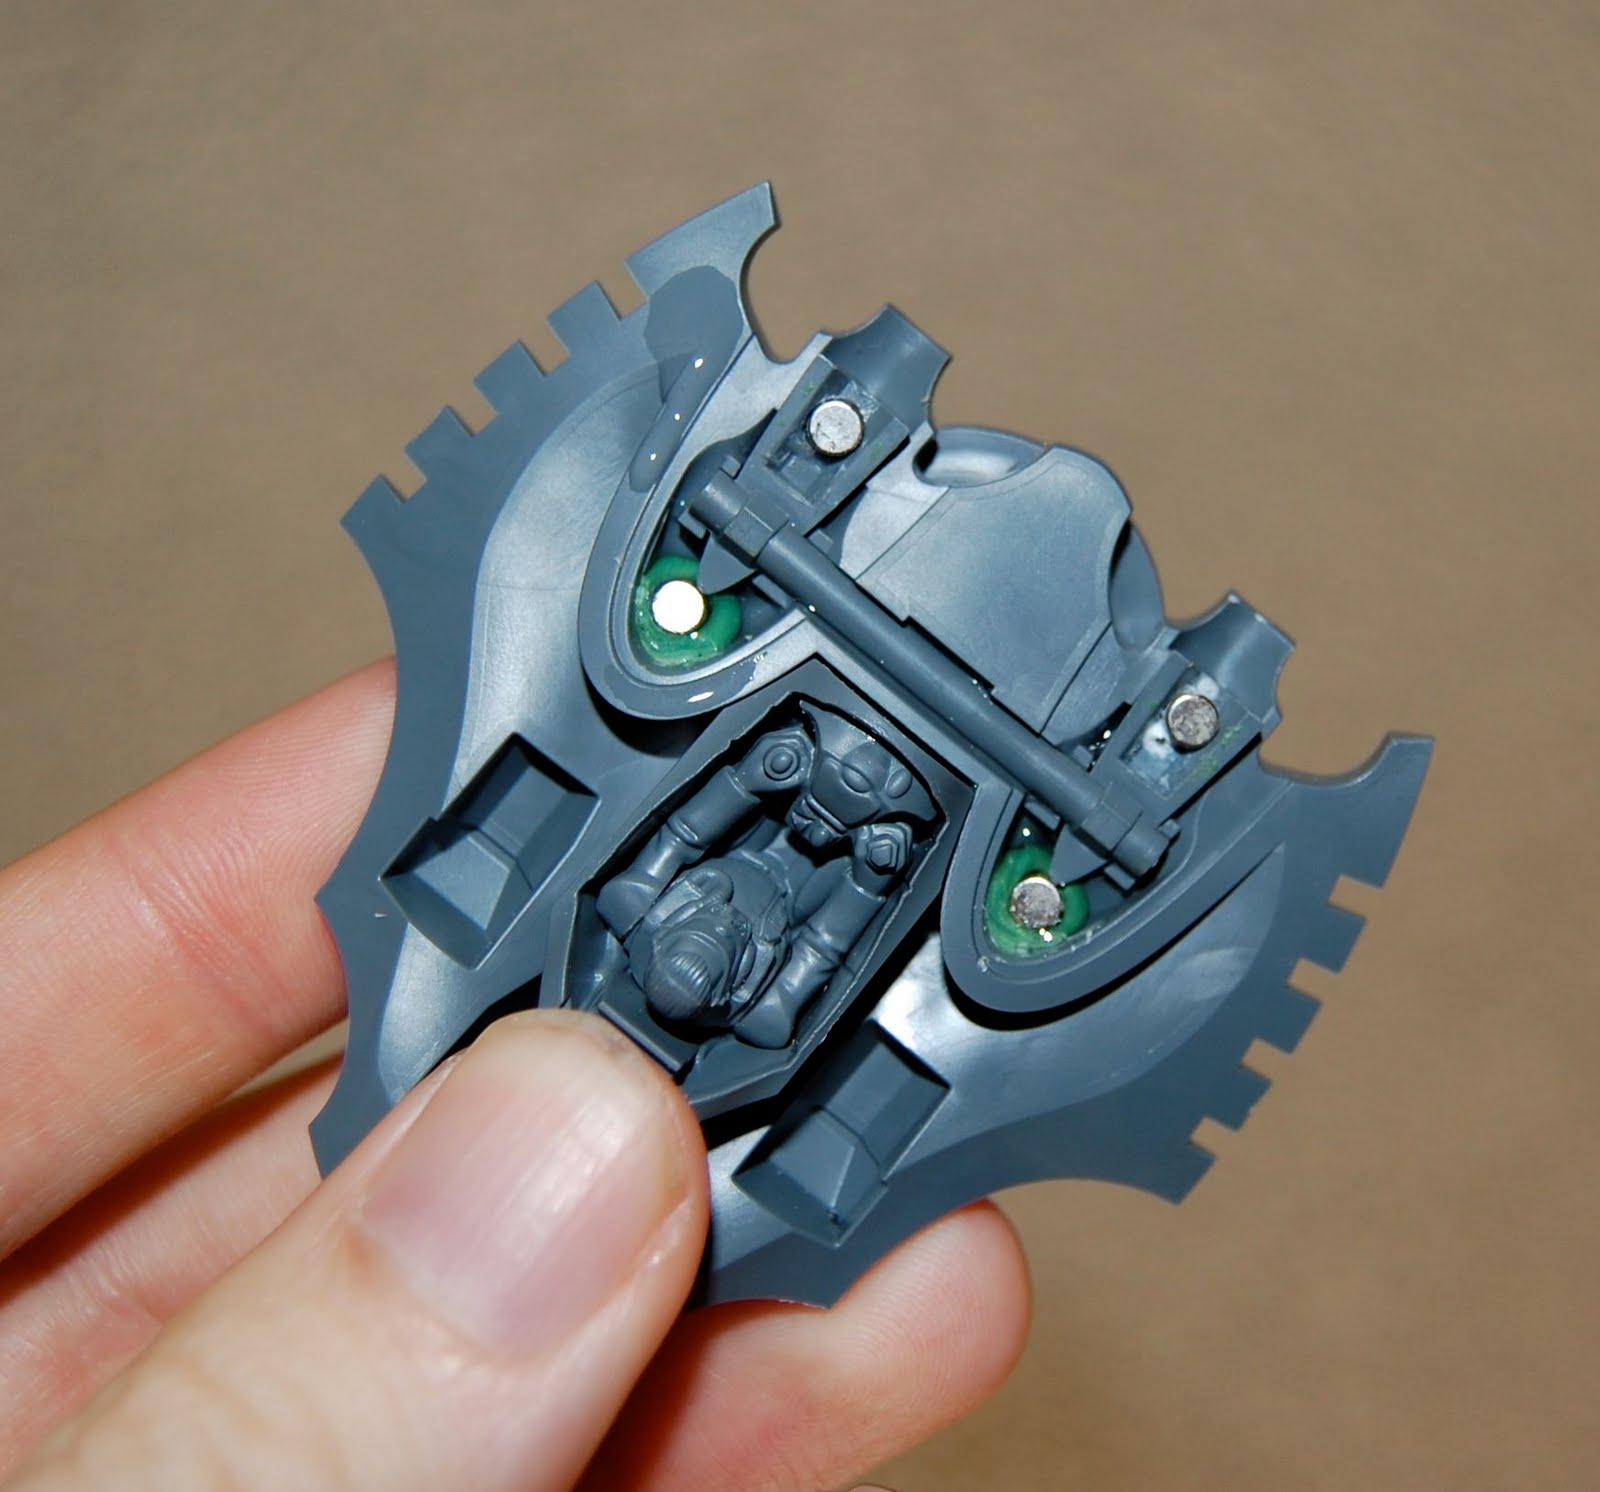
Let's get the hard stuff out of the way first.  Above you see the interior assembly of the arches.  The magnet is held in place with a greenstuff setting.  You want to use a small but powerful magnet.  This one is 1/8" wide, 1/16" thick and N52 grade.  In order to get the magnets in the right place, look below!


Glue a pair of magnets to either end of the struts.  Be sure that the glue has set, I usually reinforce it with a bit of epoxy.  When it sets, put some greenstuff in the arches and place another magnet on either end of the struts.  Widen the opening of the arches a tiny bit so that you can get the magnets in and out easily without breaking them.  Shove both ends in the arches so that the unglued magnet wedges into the greenstuff.  This way you know it's in the right place.  Double, triple check that your bell/censer is facing the correct direction because the arches must go in the correct side.  I messed up on this part twice and had to redo it.


Above you see the yoke.  Take two tiny magnets, the 1/16" ones are perfect.  Chop off a tiny, tiny bit of the ends and replace them with magnets.  They should still be the same distance apart as they were before.  This can be tricky, you should measure twice and cut once.


Before gluing the bell together, you'll need to get the Grey Seer in position.  Put him together except for the hand grabbing the bell.  Notice in the picture above he has the handle, do as I say not as I do.  I had fitted him, glued the hand and then taken the picture.  You'll need to properly fit him before you glue his hand.  Drill two holes in his feet next to the nubs that go into the corresponding parts on the bell.  Don't drill in the nubs themselves.  Put two small magnets in.


Place the Seer on top of the bell, put a drop of glue where you think his feet are, then drop a magnet in.  It will fall into the spot where the feet are.  The second one is trickier because the second magnet will want to go where the first one is.  Once you get both in and the seer stays up just fine, you can glue the bell together, and magnetize the Horned Rat symbol on top of both the bell and censer.


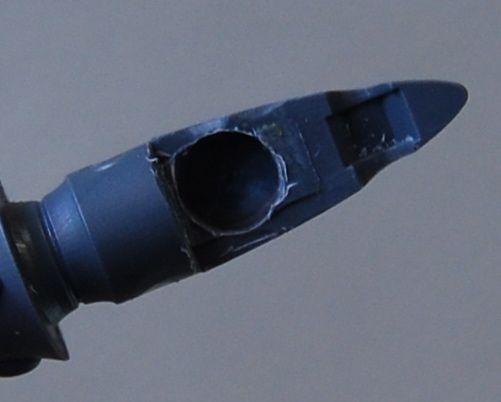
Now let's finish the Seer.  Very, very carefully drill into the handle on each side and place a magnet in each one.


You can't really see it in this picture, but I drilled a small hole and stuck a bit of paperclip in each side where the handle for the Seer meets the bell.  You don't need a full magnet, just enough force to help hold him in place as the feet provide most of the lift.  I then filed it flat and filled in the gaps so hopefully when it's painted you won't be able to see anything.


Now let's test it out.  Here's the censer assembly sans monks...


And here's the bell assembly sans Seer.  To attach this to the frame of the bell/furnace simply slide the pegs of the arches into the corresponding hole.  You can magnetize this part but it's firm enough that there's really no need.  I didn't bother.


Now the easy part.  Glue a powerful magnet on the underside of the front platform.


Put a magnet on the bottom of the brazier and the Plague Priest, be sure to check the fits and all that stuff.


The back platform is reversable.  It is not a weight-bearing part so I used a weird method to get it in.  Most of the weight is supported by the frame itself, I just wanted an extra bit of holding power without any visible point of contact.  I put two magnets in the sides and then added a magnet on the underside of the frame as seen below.


The magnets don't have contact but they still attract each other.


 To magnetize the Rat Ogre and Plague Monks to the platform simply widen the holes on the platform by a tiny bit so that you can fit a 1/16" magnet in.  To magnetize the Monks/Ogre, simply cut off the pegs on the feet about halfway so you have a flat surface.  Drill in a ways, then cut off the rest of the peg.  The hole will be in the right place and you can widen it for a 1/8" magnet.


Here it is as a Plague Furnace, missing the extra censer thing that goes on the arch.  I left if off because it's not necessary and I'd rather save it for other conversions.


Finally, here it is as the Screaming Bell.

Good luck!  I'll do it for you but I charge $100 for just the magnetization, and you have to clean the mould lines.  Yes, it is cheaper to just buy another kit.  That's the point.  I'm not doing this again.

Friday, September 3, 2010

Chipped Metal Tutorial

I got an email from a reader asking me how I did my chipped metal look on the Master of the Ravenwing.


I also used this technique shown in the Stompa yesterday.  It's super easy.  Simply take a piece of foam, for small models use a bit of foam that comes in a blister, for bigger ones you can use a bit of foam from a transport pluck-n-pull or whatever they call them.


Tear it at an angle.  You want it to be a bit jagged but not too much or it will be splotchy.  Test it out on a piece of paper or something first.  Then, just dip it in your paint starting with Boltgun Metal.  Wipe it off on the paint pot so that you don't have too much on the foam.  Then dab it on the edges where metal is likely to chip.  Be sure to rotate and move the foam in different directions or else all the chipping will have the same pattern.  When you're done dab a bit with Chainmail, then a final dabbing of Mithril Silver (each one uses progressively less paint just like a highlight).

By the way, once the paint dries on the foam if you want to reuse it you'll have to tear it anew.  The dried paint drastically affects its absorption and texture.

You can also do rust with this technique but that's already been covered by many others.  I have yet to decide which I prefer but once I figure it out I'll be sure to post about it.

Wednesday, July 14, 2010

Tutorial: Magnetizing the Trygon

The body is pretty straight forward, so I won't go into too much detail, but here's how I did the head and Mawloc spines. I used 3/16" magnets for the weight bearing joins, and 1/8" for the non-weight bearing.

Note that this is not the best way to do this. I glued two magnets into the bottom part of the head. You can see some drill scars from previous attempts. I then glued a paperclip bit to the front and back of the top part of the head. I carefully bent and cut the paperclip until it touched the magnets. The best way to do this is like the way I did on the Night Spinner, making a greenstuff setting and fitting the magnets that way. My way works, but it could have been better. I magnetized the jaw in this way, and the mandibles were really easy.


The body is pretty straightforward. Be sure to check your polarities. Each side needs to have the same polarity. The left and right can have different polarities or the same, it's up to you. I make them different.


Here's how I magnetized the Mawloc spines. I glued some 1/8" magnets into the inside of the body, and sealed them with epoxy. You don't want these to come undone and rattle around the inside. The magnets are powerful enough they'll hold the spines on even through the plastic. While the body is apart, drill and glue the arm sockets. You can reinforce the insides with epoxy in case you drilled too greedily and too deep.

Monday, June 21, 2010

Magnetizing the New Night Spinner/Fire Prism

Here's how to magnetize the new Fire Prism/Night Spinner kit. While my initial impressions of the Night Spinner were poor I'd still like to give it a try. I think its real strength will be on things like Thunderwolf Cavalry.

First off, I get my magnets from KJ Magnetics. They're a fantastic supplier and from my searches have the best combination of selection and prices. The exact type of magnets you use on this project really don't matter, as you can make any type fit the setting. I just used ones that I had left over from other projects.
The first step is to glue in your mounting magnets. Don't worry about the polarity of these, they can be the same or different. They need to be flush with the surface of the plastic, so you may have to drill a little. Don't drill into your finger like I did.

Drill out a wider and deeper hole than you need on the guns. The reason for this is that we'll make a greenstuff setting, and we need room to work. I used a 3/16 drill bit to make the hole.

Now set the gun magnet on top of the mounting magnet, and place a ball of greenstuff in the setting. There's two ways to do this from here. The first is to squeeze the two together and let the GS pick up the magnet into the setting and pull it out quickly (the fast but unreliable way), or to wet the top of the magnet so it doesn't stick to the GS, press in the magnet then pull it apart and wait for the GS to cure and then glue the magnet into the setting you just made (the slow but reliable way). Here I made the setting and glued it later, but on the Night Spinner guns I used the first method. Whatever works for you.

Here you can see the magnet in the GS setting. Make sure the GS fully cures before you go around testing it. I like to add a dab of superglue to the edges just to help it stay in place.

Fire Prism...

...and Night Spinner!

Okay, now for the housing. Here I used some GS to make a setting for the mounting magnet. Make sure it is far enough back that it won't get in the way of the guns. You can actually trim off the end of the guns (the part that goes into the housing) since no one will see it and it serves no functional purpose.

Use the GS to make a setting again. Since the housing doesn't bear any weight you can use a smaller magnet. You could even just use a portion of a paperclip if you wanted. Just be careful that you test the fit with the upper portion of the turret hull on or else the housing will not fit properly.

Here you can see all the housings magnetized.

Friday, February 19, 2010

Photographing Your Minis

Here's how I photograph my models. You don't need a fancy light box, just a backdrop, tripod and a camera that allows you to adjust your aperture and shutter speed manually. If you are not sure what those terms mean, I'm not going to go into it, it's pretty easy to learn the basics online.


Here's my setup. I simply use natural lighting. Do not use direct lighting, it will create harsh shadows. I use indirect sunlight. Overcast days are the best for this but in the high desert of southern California such are rarities, along with people driving under the speed limit. Gentle indirect sunlight, such as that from north-facing windows (if you're in the northern hemisphere, folks down under will have to reverse those instructions) is the best. Make sure all artificial lights are off as they will add unwanted color to your photo. Incandescent bulbs will give it a yellow cast while fluorescent will give a nasty cold green. I'm not sure about the "natural light" bulbs which claim to be pure white, I figure natural sunlight works fine for me. It has a tone of its own but I'm familiar with it and can easily correct the color balance.

The next thing you need is a backdrop. My main one is a blue-to-white fade. The top is 75% pure blue and the bottom is 25% blue. You can make it yourself with Photoshop but I understand you can also find them online and simply download them. I'm not sure why everyone uses blue, but it does seem to work really well, it makes the mini stand out better than a gray backdrop. Unless you're playing Ultramarines, or an army covered in woad. If you don't have this, or don't want to spend an entire print cartridge on just one backdrop (by the way it needs to be at least 11" wide, you'll have a tough time with large vehicles if not) a simple light gray shirt or pillowcase will suffice. A large piece of off-white paper actually works quite well. I use an off-white piece of paper for photographing my Tyranids as it makes the blue stand out better.

Set it up with a gentle curve. You don't want a fold. I support mine with a diaper box and two spray cans, but you don't need to follow my recipe exactly.

Next you'll need a tripod. I bought mine for less than $10 in Circuit City's death throes. You can find them quite cheap, usually from sketchy people in heavy tourist areas. I have been to Italy and they certainly have a thriving tripod industry. When Francesco de Sanctis designed the Spanish Steps I'm quite sure he never imagined a bunch of non-Italian peddlers hawking tripods, bizarre toys and knock-off handbags on them. Anyway, you can get one for cheap. It doesn't need to be a big one. If you can't get a tripod, try balancing your camera on some books. It gets hard when you need to do a top-down shot and you're balancing on books.

If you notice in my picture above, the tripod is on the chair. This is so I can get a straight on shot. With the legs folded it is too tall, so this is what I found that works best.

Finally, your need to have a camera that will let you manually set the aperture and shutter speed. What you want is a closed down aperture, the higher the number the better (a real photographer will probably argue that point but it works). This means you will need an exceedingly slow shutter speed. Mine generally runs at a couple of seconds, some days with less light I have had the shutter open for at least ten seconds. On that note, unless you have a remote for the shutter, you will need to set the timer for the exposure. Otherwise, when you hit the button, the mere pressure from your hand will shake the camera, making your photograph look like the filming of Cloverfield. Simply hit the timer, stand back and let the camera do its thing.

The reason you need the previous step is for the focus of the mini. If your aperture is wide open, the foreground and background of the picture will be out of focus. I'm sure you guys have all seen pictures of models mostly out of focus. By closing down the aperture, and therefore having to increase exposure time, it puts the whole miniature in focus. You'll notice that even on huge models like my Barbed Hierodule the whole thing is in focus.

Later I put the image through Photoshop and adjust the white balance, crop it and that's it! It's cheating to do touchups on your own painted models.

For the TLDR crowd, indirect lighting, tripod, and slow exposure. Hope this helps, let me know if I wasn't clear on anything in the comments.

**Post Edit 1/15/11** I have improved my technique even further.  I bought a full size tripod at a garage sale for $5.  It's fantastic.  Also, I've discovered that I don't need to close the F-Stop all the way.  Depending on the mini you can adjust it in the midranges and still have everything in focus.

Wednesday, January 13, 2010

How To Paint Ravenwing

Here's how I paint the Ravenwing. A note on these bikes, they are a commission, and were given to me in various states of disrepair. With a Ravenwing upgrade sprue, I made them better looking though I couldn't replace the bike's cowls.

First off, prime it black (duh). Undercoat the guns, seat and eyes with Scab Red, the areas that are going to be white or very light colored (such as the headlight) with Codex Gray, and purity seals/parchment/saddlebags with Bestial Brown. Paint the base Bestial Brown as well. In this post I explain how to do purity seals. None appear on this model, so check that post out if you want more information on how to do them. Since you're priming with black, you'll need to undercoat them with Bestial Brown so the Bleached Bone actually stands out.

Now paint the guns and eyes Blood Red.  It may take two coats to appear even.

Paint the saddlebags with Bubonic Brown. It will look terrible, but now wash it with Devlan Mud and you will see magic happen. While you're at it, wash the guns with Baal Red. We'll get to the metallics of the guns later.

Next, go over the white areas with Skull White. It may take two coats to be somewhat even but it doesn't have to be perfect. Make the headlight white, then paint it yellow, followed by a Gryphonne Sepia wash. Then, put a dab of yellow in the center of each section of the headlight. Scroll to the last picture to see a closeup of the headlight.

Now it's time for the metallics. Use Boltgun Metal to get all the trim and weapons, also drybrushing the engine area. This would have been easier if the rider were not glued to the saddle, but alas I did not assemble the model. Paint the frame of the headlight, but be careful because you don't want to redo your highlight. When done, wash the metallics, white and red with Badab Black (don't wash the headlight, you're done with that). Add any decals at this point.

Next, highlighting time! Use Blood Red for your first highlight of the guns, followed by Blazing Orange spot highlights (don't forget a dab on the eyes). I use Chainmail and then Mithril Silver for the metallics. Highlight the saddlebags with Bubonic Brown. For the black, I used a mix of blue and white for each highlight. I don't know my proportions, I just mixed until it looked good. I do remember that there's more blue in each layer so it gets cooler. The final highlight is more of a pale blue than a gray. I used four layers of highlight, but I probably could have gotten away with three.

Finally the weathering. I use the stippling brush and Bestial Brown to make mud splatters. I also use the Tamiya Weathering Powders for the exhaust stains and weapons bluing, you can see the effects in this post.

And that's it! I did the power sword later, you can see it when I post the finished squadrons later.

Monday, September 14, 2009

How To Make Razorwire


Ok, now it's time to put some razorwire on those sprue barricades we made in a previous post.

First off, cut yourself a length of very fine wire. For these I used 22 gauge wire that I got for cheap at Lowe's. There are plenty of ways to get free wire, but I wanted to be spared the hassle. Keep in mind that every foot of wire is going to equal slightly more than 1" of razorwire, so 6' of wire would be a bit more than 6" of wire. Since our sections are 6" long, 6' is a perfect length.

Bend the wire in half, and tie the loose ends around something stable like a chair.


Take the other end and put it into your drill. Make sure it is in there tight.


Now, run the drill until the wire is very tightly wound. Don't let the wire go slack, it will cause wrinkles and folds in the wire line. A few of those will add some character, but too many will ruin the line. Cut off the wire at both ends.

With the long section of wire, wrap it around something round like a larger paintbrush or your hobby knife. Obviously, you can control the diameter of the wire by using different objects. Find whatever looks best to you.


After it is wound up, I like to counter-wind it a bit with my hands. To do this I simply bend the wire gently in the opposite direction of how I just wound it. This loosens it up and makes it a bit more realistic.

Finally, wrap the wire around the 6" section that you had from the previous post. Now, lay it on top of the two barricades and glue it into position. Use superglue to fix the wire to the plastic, and make sure you superglue both ends of the wire. Finally, matte seal it to get rid of the plastic glue sheen.

The reason you want to fix the wire on the support before putting it on the barricade is because the tension in the wire will cause the barricade to buckle. Look at the first picture in this post; you can see that half the feet aren't even on the ground. After trying countless times to fix it, I finally ripped the 6" section off and wound the wire on that, then set it on the barricades and it worked beautifully.

You can of course mount the wire on whatever you want, this is simply the way I do it.

Thursday, September 10, 2009

Making Terrain Out of Sprues


Here's a way to make barricades and other obstacles for cheap as free! I can't bear to throw anything away, and as my pile of empty sprues grew higher and higher I figured I had to do something to take care of them all. Finally, I discovered an easy way to make caltrops style tank barricades. I later topped them off with razorwire, but that's a post for another day.

The first step is to cut several straight segments of sprue. For each barricade, cut out three 1 1/2"-2" segments. If you plan on making razorwire-type barricades cut 6 of these smaller segments and a 6" segment as well. After they are cut, sharpen one end to a point on the small sections, and both ends on a 6" section. Whittle down the plastic to make it worn looking.


Sprues are in a somewhat trapezoidal shape. When you whittle them, try to take more off the thicker corners to make them more square.

After whittling them, glue two into an X shape. Give the glue a bit of extra time to dry as you aren't gluing preformed pieces into shape. After they dry stand it up and glue the third piece to form a tripod shape. At this point I use paint bottles on each corner to support the whole thing until it dries completely.


If you are simply going for tank traps, go ahead and stop here. I simply prime them black and give a very light drybrush of Boltgun Metal. You can mount them on a 6"x2" base if you wish, or just set them up on the table as they are. If you want to make the razorwire, check for my next installment on how to make your own wire and how to set it on the barricade without bending the whole thing out of shape (not as easy as it sounds).

Related Posts:

Related Posts with Thumbnails